

Hot Chocolate Party: Stacked Oreo Cake and Homemade Marshmallows
Baby, it's cold outside! So cold that most nights I just want to stay in with a mug of hot chocolate. That’s when I had the idea to throw a Hot Chocolate Party with my friends at StyleBlueprint.com. A relaxed event with an edgy throw back vibe that both kids and adults could get on board with.
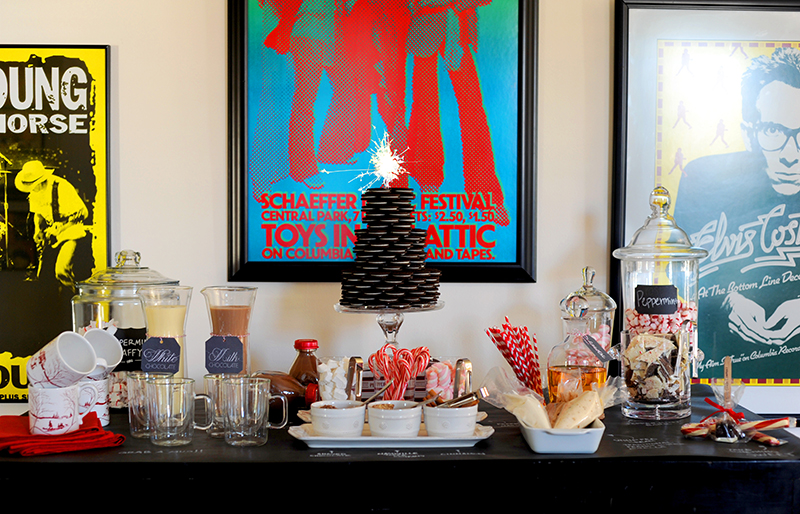
The Red House's vintage music poster collection inspired me to keep the color scheme simple by just using black and white with a punch of red. Add in an assortment of hot chocolate flavors, special sweets and toppings galore and you've got a stress-free gathering that people will talk about year-after-year. For a complete HOW-TO and more inspiring photos head over to StyleBlueprint.com.

When I began planning this Hot Chocolate Party I knew that I would need a centerpiece for the table that would WOW. I really wanted it to be eatable, as to be part of the "toppings" table. Instead of an intricate cake, I opted for an easier, yet still stunning, bake-free cake that literally made everyone gush (and feel like a kid again).
This Stacked Oreo Cake is SUPER simple to put together (no baking or cooking knowledge needed) and it really made a big impact at the party. I placed a sparkler on top and everyone loved how festive it was—made something so simple feel really special.
Here's how to put it together:

Stacked Oreo Cake
Start with a 8 inch cardboard round and 4 family size packages of Oreos (you'll have a handful left over … you know what to do). You'll also need to make a small batch of Royal Icing (recipe here) to use as glue. Go ahead and add some extra confectioners' sugar to it to make sure it is really thick—you'll use this to hold all your Oreos together.
Start by arranging the first layer of Oreos in a circle on top of the cardboard. Go back, picking up each one, and place a small dollop of icing to the bottom to each cookie. Place each cookie back and repeat the process, stacking each layer until you reach your desired height.


I also really wanted adorable star and snowflake shaped marshmallows to float in the top of hot chocolate mugs and decided to make them myself. This was my first time making homemade marshmallows and I have to tell you I was a little intimidated going into it. They were really easy to make though, VERY messy and incredibly delicious.
Here’s the recipe and how-to:
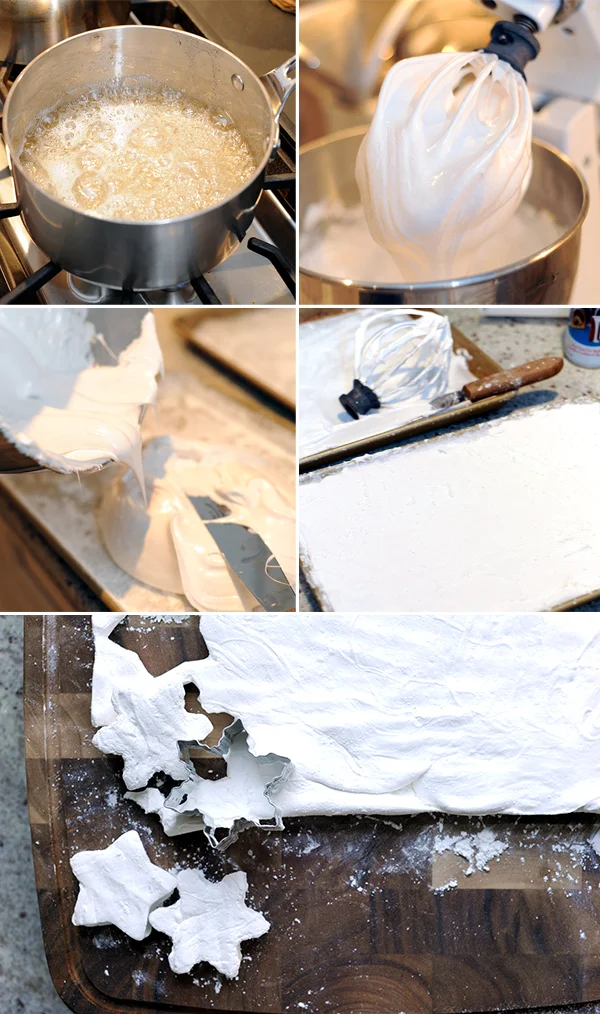
Homemade Marshmallowsby Alton Brown3 packages unflavored gelatin 1 cup ice cold water, divided 12 ounces granulated sugar, approximately 1 1/2 cups 1 cup light corn syrup 1/4 teaspoon kosher salt 1 teaspoon vanilla extract 1/4 cup confectioners’ sugar 1/4 cup cornstarch Nonstick spray Place the gelatin into the bowl of a stand mixer along with 1/2 cup of the water. Have the whisk attachment standing by.
In a small saucepan combine the remaining 1/2 cup water, granulated sugar, corn syrup and salt. Place over medium high heat, cover and allow to cook for 3 to 4 minutes. Uncover, clip a candy thermometer onto the side of the pan and continue to cook until the mixture reaches 240 degrees F, approximately 7 to 8 minutes. Once the mixture reaches this temperature, immediately remove from the heat.
Turn the mixer on low speed and, while running, slowly pour the sugar syrup down the side of the bowl into the gelatin mixture. Once you have added all of the syrup, increase the speed to high. Continue to whip until the mixture becomes very thick and is lukewarm, approximately 12 to 15 minutes. Add the vanilla during the last minute of whipping. While the mixture is whipping prepare the pans as follows.
Combine the confectioners’ sugar and cornstarch in a small bowl. Lightly spray a 13 by 9-inch metal baking pan with nonstick cooking spray. Add the sugar and cornstarch mixture and move around to completely coat the bottom and sides of the pan. Return the remaining mixture to the bowl for later use.
When ready, pour the mixture into the prepared pan, using a lightly oiled spatula for spreading evenly into the pan. Dust the top with enough of the remaining sugar and cornstarch mixture to lightly cover. Reserve the rest for later. Allow the marshmallows to sit uncovered for at least 4 hours and up to overnight.
Turn the marshmallows out onto a cutting board and cut into 1-inch squares using a pizza wheel dusted with the confectioners’ sugar mixture. Once cut, lightly dust all sides of each marshmallow with the remaining mixture, using additional if necessary. Store in an airtight container for up to 3 weeks.

Check styleblueprint.com for my entire hot chocolate party (this is just a tiny preview). Love the mugs and serving pieces seen here? Grab them at COLOR, The Registry and William Sonoma. Also, go check out The Red House, one of Franklin's best event venues, and Honey's Vintage Sweets for hundreds of sweet treats.
Related articles
- Pie Party for Styleblueprint.com (stylingmyeveryday.com)
- A French Themed Cocktail Party (stylingmyeveryday.com)
- Chocolate Eclairs (stylingmyeveryday.com)
- Chocolate Lava Cakes (stylingmyeveryday.com)
- Sugar Cookie Turtle Doves (stylingmyeveryday.com)
- French Macaroons(stylingmyeveryday.com)


